
If your hot water has started running out faster, making popping sounds, or looking a little rusty, sediment may be building up inside the tank. Knowing how to flush water heater systems properly can help restore performance, improve efficiency, and extend the life of the unit. It is a straightforward maintenance task in some homes, but there are a few cases where a careful approach matters.
Water heaters collect mineral sediment over time, especially in areas with hard water. As that layer settles at the bottom of the tank, the system has to work harder to heat water. You may notice higher energy use, uneven water temperature, or extra noise during heating cycles. Left alone for too long, sediment can shorten the life of the tank and create avoidable repair issues.
Why flushing a water heater matters
A tank-style water heater heats from the bottom. When sediment builds up there, it creates a barrier between the burner or heating element and the water. That makes the unit less efficient and can put more stress on key components.
Regular flushing helps remove that buildup before it becomes a bigger problem. In many homes, this means better hot water recovery, less strain on the system, and fewer surprises when you need consistent hot water most. For property managers and business owners, it can also help reduce wear on equipment that serves multiple occupants or higher daily demand.
That said, flushing is not always risk-free on older units. If a tank has not been maintained in years, draining it can sometimes disturb heavy sediment or expose hidden weakness in the drain valve. If the water heater is already leaking, producing discolored water that does not clear up, or showing signs of age and corrosion, service is usually the smarter next step.
How to flush water heater systems safely
Before you start, make sure you are working with a standard tank water heater and not a tankless unit. Tankless systems need a different descaling process.
For a typical gas or electric tank, you will need a garden hose, a flathead screwdriver in some cases, and a place to drain several gallons of hot water safely. A floor drain, driveway, or large utility area may work, but always be careful about hot discharge.
Step 1: Turn off the power or gas
For an electric water heater, switch off power at the breaker. This step matters because electric heating elements can be damaged if the tank is partially drained while still energized.
For a gas water heater, turn the thermostat to the pilot setting or shut off the gas supply if recommended by the manufacturer. If you are not comfortable working around gas controls, stop there and schedule service.
Step 2: Shut off the cold water supply
Find the cold water shutoff valve above the tank and close it. This prevents more water from entering while you drain the unit.
Step 3: Let the water cool or use caution
Hot water inside the tank can cause burns. If time allows, wait a few hours after shutting off the heater so the water can cool down. If you need to do the flush sooner, open a nearby hot water faucet for a short time and take extra care during draining.
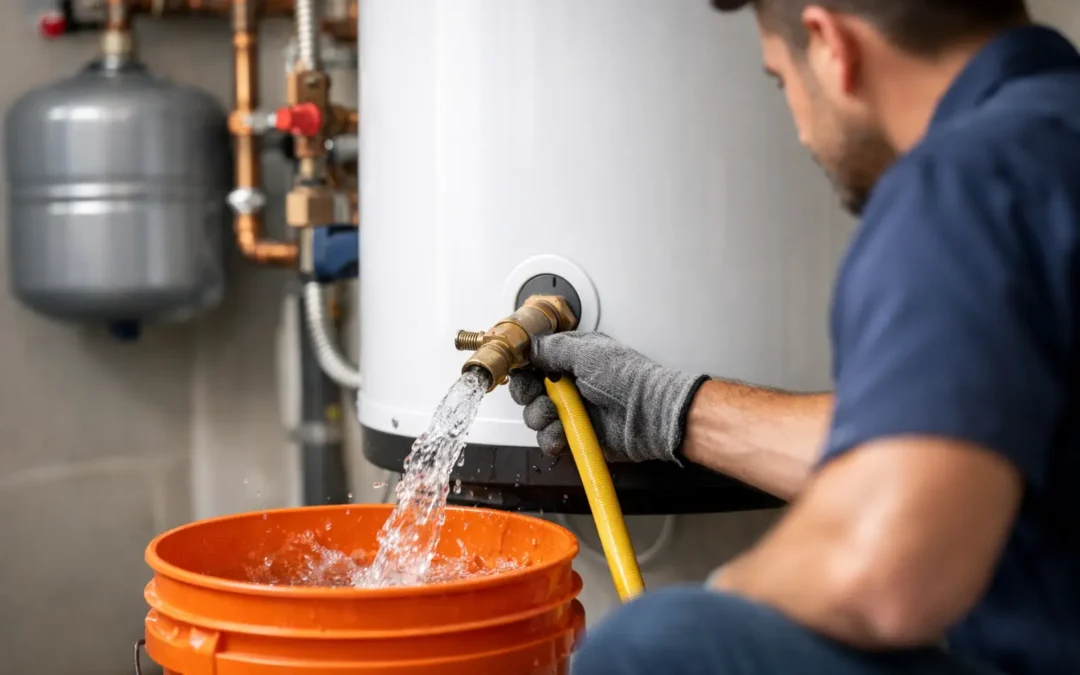
Step 4: Connect a hose to the drain valve
Attach a garden hose to the drain valve near the bottom of the tank. Make sure the other end is placed where hot water can drain safely without damaging flooring, landscaping, or nearby materials.
A secure connection matters here. A loose hose can leak quickly once the valve opens.
Step 5: Open a hot water faucet nearby
Turn on a hot water faucet at a sink or tub inside the building. This helps relieve pressure in the system and allows the tank to drain more smoothly.
Step 6: Open the drain valve
Carefully open the drain valve on the water heater. Water should begin flowing through the hose. In some tanks, sediment may slow the drain or clog the opening. If that happens, do not force the valve aggressively. On older units, that can create a leak that will not close properly afterward.
Let the tank drain until the water runs clearer. In homes with light buildup, this may happen fairly quickly. In tanks with more sediment, you may need to drain fully and flush a bit more thoroughly.
Step 7: Flush out remaining sediment
Once most of the tank has drained, briefly open the cold water supply to stir up remaining sediment while the drain valve stays open. This sends fresh water into the tank and helps carry more debris out through the hose.
You may need to repeat this a few times until the discharge looks clear. If large flakes of sediment keep coming out, or if flow stays weak, the buildup may be heavier than a basic flush can fully resolve.
When flushing does not go smoothly
Some water heaters cooperate. Others make it obvious they need professional attention.
If the drain valve will not open, the hose connection leaks, the tank does not refill properly, or the hot water stays discolored after flushing, there may be a deeper issue. Sediment is not the only cause of poor water heater performance. A failing anode rod, corrosion inside the tank, valve problems, or heating component issues can create similar symptoms.
This is especially true for older systems. A water heater nearing the end of its service life may not benefit much from a flush if the larger issue is internal wear. In those cases, maintenance can still provide answers, but it should be handled with a repair or replacement plan in mind.
How often should you flush a water heater?
For many homes, once a year is a good baseline. If your water supply has high mineral content, flushing every six months may make more sense. Properties with heavier hot water use, such as multi-bath homes or light commercial spaces, may also benefit from more frequent maintenance.
The right interval depends on local water quality, system age, and how hard the heater works day to day. If you are hearing rumbling or popping sounds from the tank, that is often a sign sediment is already accumulating enough to affect operation.
If you recently moved into a home and do not know the maintenance history, it is worth having the unit inspected before attempting a first-time flush on your own. That can help you avoid turning a neglected system into an emergency call.
Signs it is time to call a professional
There is a difference between routine maintenance and forcing a problem. If your water heater is leaking from the tank, producing little or no hot water, tripping breakers, shutting down unexpectedly, or showing visible rust around fittings and valves, a flush is unlikely to solve the whole issue.
Professional service is also the better option if the unit is older, if the drain valve appears fragile, or if you are managing a commercial property where downtime has a wider impact. In those situations, the goal is not just to remove sediment. It is to protect the system, confirm safe operation, and avoid unnecessary damage.
A trained technician can assess whether the water heater should be flushed, repaired, or replaced. That matters because the wrong maintenance step on the wrong unit can cost more than it saves.
A few practical tips before you start
Take a quick look at the manufacturer label to confirm the model type and age. If the tank is over 10 years old, proceed carefully. Older units are more likely to have corrosion or brittle valves.
Check the area around the base of the tank before and after draining. Moisture, rust streaks, or pooling water may point to a leak that was already forming. Also, never restore power to an electric water heater until the tank is completely full again. Running dry elements even briefly can burn them out.
If your drain valve is plastic, use extra care. These valves can become brittle over time. A small crack can turn a maintenance task into a replacement job.
Knowing how to flush water heater equipment is useful, but knowing when not to push your luck is just as important. A well-maintained system delivers more reliable comfort, and when something feels off, getting the right help early usually costs less than waiting for a full failure.
